Climbing Aconcagua: acclimatisation schedule
Published 11 April 2026 · 10 min read
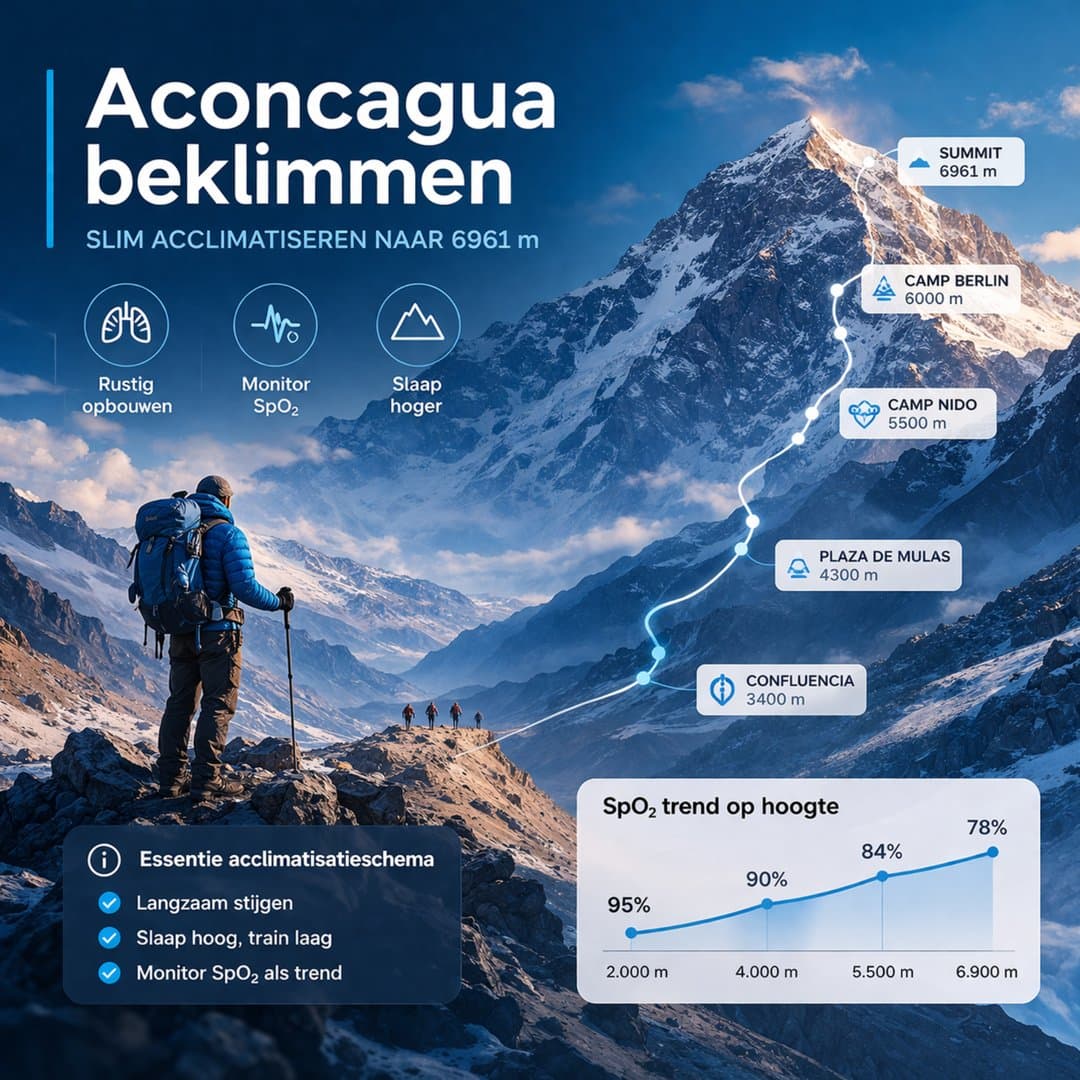
A good Aconcagua acclimatisation schedule is often more important than sheer fitness. Those who want to climb Aconcagua will benefit most from a gradual build-up of sleep altitude, sufficient rest days and clear decision rules along the way. In this article you will read what a smart Aconcagua acclimatisation schedule looks like, where climbers often go too fast and how you can already build up a useful pre-stimulus at home.
Short answer: a good Aconcagua acclimatisation schedule Builds height gradually, uses rest days deliberately and leaves extra margin around higher camps.
Practical rule of thumb: Do not increase your sleep level further if sleep, recovery, appetite or SpO2 trend deteriorate.
Important: Those who already smartly pre-acclimate at home often start the expedition with more space and less pressure.
Conclusion: for Aconcagua, a gentle build-up with additional braking between 4300 and 5600 metres usually works best.
Nuance: no scheme works exactly the same for everyone, as altitude sensitivity varies greatly.
Practical hook: Think not only in top day, but especially in sleep level, recovery times and decision rules.
Why Aconcagua demands more than just fitness
At 6961 metres, Aconcagua is a serious expedition mountain. As a result, this is no ordinary trekking peak. Not only the altitude plays a role, but also the duration of exposure, dry air, wind and the effect of several nights at altitude. This is precisely why it pays to understand well in advance what happens in the first 72 hours at altitude.
The biggest fallacy is often that strong basic fitness would be enough. In reality, it is precisely your response to oxygen deprivation that determines how smoothly an expedition goes. Many climbers are still able to move fine during the day, but see their recovery decline markedly at night. On Aconcagua, therefore, not automatically the strongest athletes win, but usually the climbers who dose their build-up better.
⚠️ Reality check
Those who feel good at 3400 or 4300 metres are not automatically ready for 5500 metres and higher. Just above that zone, you often see that sleep, appetite, headaches and recovery suddenly become less predictable.
What is a good Aconcagua acclimatisation schedule?
A good Aconcagua acclimatisation schedule incrementally increases the sleeping height, consciously builds in rest days and uses the principle carry high, sleep low where possible. That sounds simple, but especially on Aconcagua, things often go wrong as soon as the planning becomes too tight or the group wants to sleep higher too quickly.
The main logic is simple: adjust first, then increase further. This requires discipline, because the temptation to push on is strong. Yet that very brake is often the difference between a strong summit push and a schedule that falls apart along the way. That's why it also helps to know in advance what a normal acclimatisation rate per 1,000 metres is.
The core of the build-up
For the normal route, this structure usually works:
- calmly arrive at lower altitude
- limited initial exposure around Confluencia
- A serious grassroots phase in Plaza de Mulas
- load carries to higher camps without immediately sleeping higher
- sleep higher only when symptoms, sleep and recovery allow it
- build in extra margin for the summit push
The most important thing about a Aconcagua acclimatisation schedule is not how much ambition you have, but how much recovery space you save between higher camps. Those who advance too quickly often lose more time later.
That's why you need a Aconcagua acclimatisation schedule not as a fixed schedule, but as a flexible plan with clear stopping, resting and winding down times.
Example of an Aconcagua acclimatisation schedule
The example below is intended as a practical guide to the normal route. Do not think of it as a rigid schedule, but as a realistic basis. The right pace always depends on your previous history, weather window, logistics and individual response to altitude.
| Phase | Sleeping height | Target | Practical focus |
|---|---|---|---|
| Day 1 to 2 | 2400 to 2800 m | Arrive and find rhythm | Hydration, move calmly, do not force directly |
| Day 3 to 4 | Confluencia, approximately 3,400 m | First height incentive | Calm pace, monitor appetite and complaints |
| Day 5 to 7 | Plaza de Mulas, approx. 4300 m | Basic acclimatisation | Recovery, short hikes, take first rest day seriously |
| Day 8 to 10 | 4300 m sleep, carry higher | Carry high, sleep low | Bringing material higher and sleeping back lower |
| Day 11 to 13 | Camp Canadá or Nido zone | Next sleep step | Only further with stable sleep and good recovery |
| Day 14 to 16 | 5600 m zone | Top preparation | Extra caution, follow weather window, do not push |
| Day 17+ | Top day and descent | Summit push | Only leave when there are sufficient reserves and stable signals |
Day 1 to 2
Sleeping height: 2400 to 2800 metres
Objective: gaining weight and finding rhythm
Practical focus: hydration, move slowly, do not force it
Day 3 to 4
Sleeping height: Confluencia, around 3,400 metres
Objective: first height incentive
Practical focus: quiet pace and complaints monitoring
Day 5 to 7
Sleeping height: Plaza de Mulas, around 4300 metres
Objective: basic acclimatisation
Practical focus: recovery, respect short hikes and rest day
Day 8 to 10
Sleeping height: 4300 metres sleep, carry higher
Objective: carry high, sleep low
Practical focus: depositing material higher and sleeping lower again
Day 11 to 13
Sleeping height: Camp Canadá or Nido zone
Objective: next sleep step
Practical focus: only through with stable symptoms and good recovery
Day 14 to 16
Sleeping height: 5600 metres zone
Objective: top preparation
Practical focus: extra cautious and weather window tracking
Day 17+
Sleeping height: top day and descent
Objective: summit push
Practical focus: only start with sufficient reserve and stable signals
Where does an Aconcagua acclimatisation schedule usually go wrong?
Why an Aconcagua acclimatisation schedule is often built up too quickly
The biggest mistake is usually not a lack of motivation, but rather a lack of brake. Many climbers feel pressure from planning, group or weather window. As a result, they slide uphill faster than their recovery allows. You often see this first in sleep, appetite or morning feeling, and only then in more obvious symptoms.
1. Sleeping higher too fast
A carry often succeeds before a good night at the same altitude.
2. Ignoring bad night
One bad night is possible, but a downward trend calls for rest or stand still.
3. Not eating or drinking enough
A lower appetite often makes recovery, mood and decision-making worse.
4. Focusing too early on the summit day
Those who are already mentally attached to the summit push often adjust less objectively.
This is precisely why it makes sense to have a broader security base and recognise signals early. This is also in line with the logic behind altitude sickness: problems often arise not from one mistake, but from a sum of rising too fast, recovering too little and adjusting too late.
Pre-acclimatising at home for Aconcagua
For Aconcagua, pre-acclimatising at home can be very useful. Especially if you have limited time at destination, were previously sensitive to altitude or prefer to start your expedition with more margin. In practice, this is usually done with normobaric hypoxia. This does not involve reducing air pressure, but the oxygen percentage in the inhaled air.
What is important is the right expectation. An altitude tent does not replace real acclimatisation on the mountain. However, such a route does make the process controlled, measurable and planable. For many expedition climbers, this can significantly reduce the risk of complaints, provided the build-up is gradual. Those looking for more background can also read about acclimatising at home for mountain expeditions.
Practical home building in the weeks before departure
- ideally start 3 to 5 weeks before departure
- gradually build up sleep duration
- start at moderate simulation height and only increase at stable trend
- track morning feeling, sleep quality and SpO2 trend
Thus, you will not leave as a fully acclimatised climber, but you will often leave as a climber with a useful pre-stimulus and more rest in the first expedition days.
🧭 In practice
Many climbers notice the benefit of pre-acclimatisation not only in numbers, but especially in how the first days at altitude feel. Less restlessness, faster rhythm and more leeway in logistics are often the first gains.
When should you adapt an Aconcagua acclimatisation schedule?
You must have a Aconcagua acclimatisation schedule adjust as soon as several signals deteriorate simultaneously. Look not only at motivation, but especially at SpO2 trend, sleep quality, recovery and symptoms such as headache or nausea.
Objective monitoring helps to make timely adjustments. So don't just rely on how badly you want to move forward. Use a combination of signals daily:
- SpO2 trend: look at multiple mornings, not one single value
- Sleep quality: how restless do you sleep, how often do you wake up, how do you feel when getting up
- Recovery: appetite, walking pace, fatigue and mental sharpness
- Symptoms: headache, nausea, dizziness, noticeable lethargy
When to continue?
If sleep, recovery, appetite and symptoms remain stable and the SpO2 trend does not worsen markedly.
When to slow down?
If you sleep worse two days in a row, eat less and your morning feeling deteriorates.
When to stop or descend?
In case of rapid deterioration, severe headache, marked shortness of breath or neurological signs.
Those wishing to delve further into general medical travel advice around altitude can also consult international guidelines on high-altitude travel via the CDC page on high-altitude travel and altitude illness.
When is an extra day of rest wise?
For Aconcagua, an extra day of rest is rarely lost time. On the contrary. Especially between Plaza de Mulas and the higher camps, an extra day often yields more than forced advancement. This is especially true for climbers who are physically strong but have little previous experience above 5,000 metres.
- After a moderate first night at 4300 metres
- after a heavy carry with noticeably slower recovery
- for persistent mild headaches
- in case of reduced appetite or fluid intake
- if the weather window does not yet request a direct summit push
An extra day of rest sometimes feels like a delay, but is often exactly what you need to get through later.
Common misunderstandings
“I feel good, so I can sleep higher”
Not automatically. You can tolerate a carry or exercise day well and still not be ready for a higher sleep level.
“My saturation is not perfect, so the schedule doesn't work”
That too is wrong. Always look at the trend in combination with sleep, recovery and symptoms. One single measurement says little.
“Pre-acclimatising at home makes the mountain phase unnecessary”
No. Pre-acclimatising at home supports preparation, but does not replace acclimatisation on Aconcagua.
“A strong athlete can always build up faster”
Height sensitivity does not follow a neat line with your performance at sea level. This is precisely why a leisurely schedule remains important.
FAQ on Aconcagua acclimatisation schedule
How long does acclimatisation for Aconcagua usually take?
For most climbers, more than two weeks on location is more realistic than a tight schedule with little margin. Pre-acclimatising at home can increase that margin.
Is pre-acclimatising at home useful for Aconcagua?
For many climbers, yes. Not as a replacement for real mountain acclimatisation, but as a controlled preparation that often makes the first days at altitude calmer.
What is the trickiest phase of the schedule?
For many climbers, the critical zone is between Plaza de Mulas and the higher camps. Only there do you really see whether ascent and recovery are still in balance.
For mild symptoms, should you stop immediately?
No, not always. But mild symptoms that keep recurring or get markedly worse do call for rest or schedule adjustment.
Want to start Aconcagua with more margin?
For an expedition towards nearly 7000 metres, pre-acclimatising at home in an altitude tent can add a lot of peace to your schedule. This way, you build up a controlled altitude stimulus beforehand, without losing sight of the real acclimatisation on the mountain.
Conclusion
A good Aconcagua acclimatisation schedule is not a rigid timetable, but a smart decision framework. The gist is simple: increase sleep high gradually, respect rest days, use carry high, sleep low and adjust based on trend. Those who want to go too fast often pay for it later. On the contrary, those who build up slowly increase the chances of a strong summit push.
If you want to start doing that at home, a controlled pre-acclimatisation course can give you a strong advantage. Not as a replacement for the mountain, but as a preparation that gives you more margin and more rest on an expedition where those two factors in particular often make the difference.