Acclimatising at home for mountain expeditions: complete guide with acclimatisation schedules by destination
Published 8 February 2026 · 11 min read
Many mountain travellers train for months but are still surprised at altitude by poor sleep, headaches and an empty recovery feeling. This happens not because you are not fit, but because your body is not yet used to less oxygen. In this complete guide on mountain travel home acclimatisation for mountain expeditions, you get to grips with schedules by altitude, decision moments and a logical route to proper preparation.
The essentials in 30 seconds
Conclusion: Acclimatising at home in an altitude tent lowers the chances of altitude sickness significantly by getting your body used to hypoxic sleep in a controlled way even before departure.
Nuance: It does not replace on-site acclimatisation and it does not offer a 100% guarantee, but it does make the process measurable, plannable and often calmer in the initial phase.
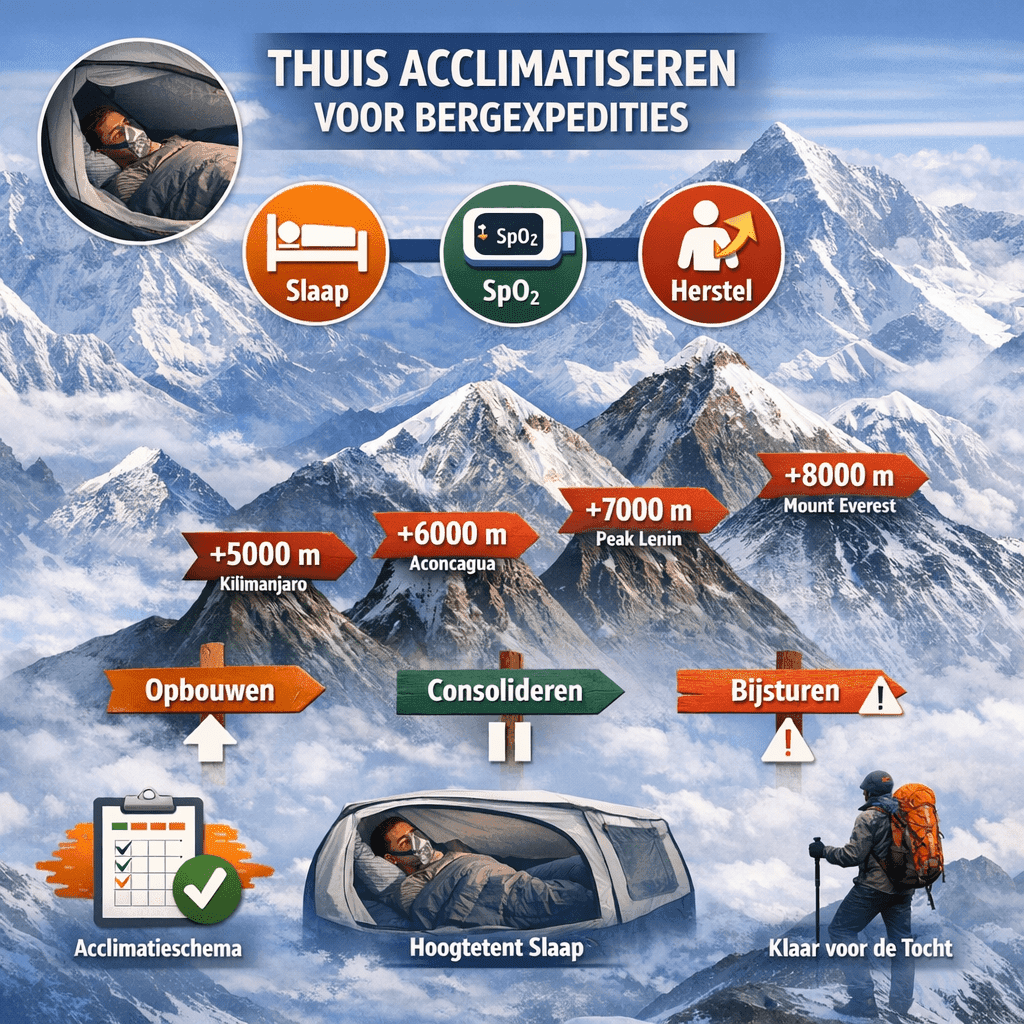
Practical lead: Choose your altitude zone (+4000, +5000, +6000, +7000, +8000 m), select the appropriate acclimatisation duration and adjust for sleep quality and SpO₂ trends.
Why this topic is so often misunderstood
The classic misconception is simple: “As long as I hike slowly, acclimatisation will come naturally.” That sounds logical, but it's only true if your itinerary allows for enough rest days and your body is given time to react to each new sleeping altitude. In practice, an expedition is rarely planned that broadly.
Many mountain trips have a tight programme, fixed overnight stops and a group pace. Then acclimatisation shifts from a natural process to a logistical challenge. And that is exactly where problems arise: your body cannot negotiate with your plane ticket.
Acclimatising at home is a way to start the process controlled and in advance. Not to eliminate all risk, but to leave with more margin, with better sleep adaptation and less chance of complaints piling up early in the trip.
💡 Did you know?
Most onset of altitude complaints start at night, not while walking. Sleep is the time when oxygen deprivation is longest and most constant. This is why many people feel worse in the morning than during the day. Home acclimatisation focuses precisely on that nighttime phase.
What happens physiologically when your body gets used to altitude
Acclimatisation is not a simple “adaptation” but a series of reactions that affect each other. As soon as oxygen availability drops, your breathing goes up. This can disrupt your sleep, as your body breathes more restlessly at night and wakes up more often.
In the longer term, other mechanisms also shift: your body optimises how it transports and utilises oxygen. Think of changes in blood volume, acid-base balance and the creation process that can eventually contribute to more red blood cells. These are not quick switches, but adaptations that take time and require recovery.
Therefore, it is normal to feel “less” in the first few days, even if you are doing well. The question is not whether you feel anything, but whether your body stabilises or continues to deteriorate.
What exactly is home acclimatisation?
Acclimatising at home is the controlled exposure of your body to lower oxygen availability before your departure. In an altitude tent, this is done via normobaric hypoxia: oxygen percentage is reduced while atmospheric pressure remains the same. This is not identical to real altitude, but it activates the same core mechanisms relevant to nocturnal tolerance, sleep and recovery.
The big advantage is that you make the process plannable. You don't have to gamble on the first night in a hut; you can see in advance how you react and where you stabilise. You avoid starting on location with a backlog that you barely catch up with later.
⚠️ Reality check
Acclimatising at home significantly reduces the risk of altitude sickness, but it is no guarantee. It works best if you think of it as controlled preparation that lets your body start adapting earlier. This gives you more decision space if sleep, recovery or SpO₂ go in a different direction than expected.
The basics: steering for sleep, SpO₂ and sense of recovery
A good schedule relies on three pillars: sleep quality, objective data and how you feel. It goes wrong if you take only one of those three seriously. Only “feeling” is too variable. Only “data” can blind you to obvious symptoms. And only “sleep” ignores that some people function briefly but reasonably well.
In practical terms, this means: look at trends, not just one measurement. A single low SpO₂ reading says little if you recover afterwards. On the contrary, a downward trend over several days, combined with poorer sleep, says a lot.
The most important question you keep asking is, “Is my body becoming more stable?” If the answer is yes, you can move on. If the answer is no, you need to adjust.
Step by step: this is how to build acclimatisation logically at home
An effective schedule is calm, predictable and suits your destination. In the beginning, you mainly want to get used to the stimulus, not sleep “as high as possible” right away. At its core, the build-up is simple:
- start at a level where you still sleep reasonably well
- Increase only when sleep and recovery stabilise
- deliberately plan periods of consolidation, not just increase
Important: the gain is often not in going maximum, but in staying stable. A slightly lower, well-tolerated step yields more adaptation than going too high and piling up nights of bad sleep.
After any substantive acceleration comes rest. So this is the anchor: you don't build up to be tough, you build up to be steady.
Acclimatisation schedules and guidance by altitude zone
Not every mountain makes the same demands on your body. The difference between 4,000 and 6,000 metres is not a matter of “slightly heavier”, but of a fundamentally different load. This is why acclimatisation at home only works well if it is tailored to the altitude zone in which your expedition takes place.
+4000 m | Mont Blanc
Around 4,000 metres, altitude really starts to be felt for the first time for many mountain travellers. Not so much while walking, but especially at night. Here, preparation is mainly about sleep adaptation: your body learns to cope with hypoxia without sleep being completely derailed.
Choose your acclimatisation time:
- Minimum (3 weeks): usually sufficient to prevent altitude sickness
- Optimal (4 weeks): risk of altitude sickness is particularly low
- Maximum (5 weeks): don't give altitude sickness a chance
+5000 m | Kilimanjaro
Above 5,000 metres, the dynamics change. Here, load and fatigue accumulate faster, especially when ascent days follow each other. Acclimatising at home in this zone is mainly to make your nights at altitude more tolerable and increase your recovery margin.
Choose your acclimatisation time:
- Minimum (4 weeks): usually sufficient to prevent altitude sickness
- Optimal (5 weeks): risk of altitude sickness is particularly low
- Maximum (6 weeks): don't give altitude sickness a chance
+6000 m | Aconcagua
Around 6,000 metres, acclimatisation becomes a strategic process. Fatigue disappears less naturally and recovery becomes a determining factor. Acclimatising at home acts as a preliminary phase here: you start adapting earlier, so your first weeks on the mountain are less reactive.
Choose your acclimatisation time:
- Minimum (4 weeks): usually sufficient to prevent altitude sickness
- Optimal (5 weeks): risk of altitude sickness is particularly low
- Maximum (6 weeks): don't give altitude sickness a chance
+7000 m | Peak Lenin
Above 7,000 metres, acclimatisation is no longer an optimisation, but a prerequisite. The goal is tolerance and function, with as little accumulation of sleep deprivation and recovery stress as possible. Acclimatising at home here is mainly meant to make your first rotations more tolerable.
Choose your acclimatisation time:
- Minimum (5 weeks): usually sufficient to prevent altitude sickness
- Optimal (6 weeks): risk of altitude sickness is particularly low
- Maximum (7 weeks): don't give altitude sickness a chance
+8000 m | Mount Everest
In the 8,000-metre zone, the margin of error becomes small. Acclimatising at home is preparation here: controlled hypoxic sleep, consistently built up, with a focus on sleep stability and recovery. The goal is not to become comfortable, but to function more predictably when altitude makes it difficult.
Choose your acclimatisation time:
- Minimum (6 weeks): usually sufficient to prevent altitude sickness
- Optimal (7 weeks): risk of altitude sickness is particularly low
- Maximum (8 weeks): don't give altitude sickness a chance
Decision moments by altitude zone: when to proceed, adjust or delay
Acclimatisation is not a linear process. What is still acceptable at 4,000 metres can be a clear warning signal at 6,000 metres. Therefore, decision moments change with the altitude zone you are in.
+4000 m: first altitude load
In this zone, it is mainly about habituation. The body learns to cope with nocturnal hypoxia, but usually still recovers quickly.
Moving on makes sense when:
- sleep is slightly restless but does not deteriorate
- morning-SpO₂ recovers within 30 to 60 minutes
- daytime energy remains fairly stable
Adjusting is wise when:
- sleep remains shallow for several nights
- headache slightly present but not increasing
- SpO₂ trend slowly declines without recovery
Slow down or pause when:
- sleep gets significantly worse
- complaints increase rather than level off
- recovery takes longer every morning
+5000 m: load stacking
From 5,000 metres, it is not only absolute altitude that counts, but also the sequence of days. Small deficits accumulate faster here.
Moving on makes sense when:
- sleep restless but functional remains
- SpO₂ stable over several days
- fatigue does not feel cumulative
Adjusting is wise when:
- night waking increases
- Morning values fluctuate with no clear trend
- daily effort feels heavier than expected
Slow down or pause when:
- sleep quality collapses markedly
- SpO₂ remains structurally lower
- complaints begin to reinforce each other
+6000 m: recovery sets the pace
In this zone, fatigue disappears less naturally. Decisions here are driven primarily by recovery, not ambition.
Moving on makes sense when:
- sleep remains variable but predictable
- SpO₂ stabilises after rest days
- your subjective feeling matches measurement data
Adjusting is wise when:
- sleep becomes patchy
- SpO₂ continues to decline slowly
- effort feels out of proportion
Slow down or pause when:
- multiple signals deteriorate simultaneously
- recovery is structurally deficient
- mild complaints no longer level off
+7000 m: tolerance zone
Above 7,000 metres, the goal is not to improve, but to function. Small signals are given more weight here.
Moving on makes sense when:
- sleep limited but stable
- SpO₂ shows no further decline
- mental clarity is maintained
Adjusting is wise when:
- sleep gets shorter and shorter
- recovery needs more time
- decreasing motivation and focus
Slow down or pause when:
- nocturnal recovery is almost non-existent
- SpO₂ no more recovery moments
- symptoms develop at an accelerated rate
+8000 m: survival zone
In the 8,000-metre zone, decision moments are sharp and non-negotiable. Here, doubt is a signal.
Moving on makes sense when:
- sleep is minimal but consistent
- SpO₂ maintains within expected range
- cognitive functions remain intact
Adjusting is wise when:
- sleep further deteriorates
- recovery slows down after rest periods
- decision-making slows down
Slow down or stop when:
- sleep virtually disappears
- SpO₂ shows no stabilisation
- symptoms increase rapidly and progressively
🧭 In practice
When in doubt between continuing or switching back, pick one variable to improve: sleep. One or two nights with markedly better sleep (due to quieter build-up or temporarily lower) often yields more gains than continuing with bad nights. You avoid piling on and you make room again for adaptation.
Common mistakes when acclimatising at home
Most mistakes are not spectacular, but predictable. And precisely because they are predictable, you can easily avoid them.
- Raising too fast: you try to give a lot of stimulus in a short time, but lose sleep and recovery.
- No consolidation: you increase too often without allowing your body to stabilise.
- Steering on one number: you are chasing a SpO₂ value instead of looking at trends.
- Underestimate recovery: you combine heavy training with hypoxic nights with no margin.
After every gear comes a brake. That's not weakness, that's strategy.
The role of an altitude tent within home acclimatisation
An altitude tent is a useful tool because you make the nighttime stimulus controlled, measurable and plannable. The primary stimulus is sleep: your body receives a consistent hypoxic stimulus for hours, without piling on extra stress during the day.
An altitude tent is no substitute for acclimatisation, but it will significantly reduce the risk of altitude sickness.
📊 Research shows
Research on pre-acclimatisation with hypoxic exposure shows that especially the first days at altitude can be milder. The effect is less in “going harder”, and more in tolerance: better sleep, less pronounced symptoms and faster rebound after exertion. Precisely that early phase often determines whether your plan remains feasible.
Where Altitude Dream makes a difference as a companion
Because reactions to hypoxia are personal, it is valuable to not only follow schedules but also understand them. The difference between “take a break” and “slow down now” is often in small signals that you only recognise when you put them side by side: sleep, trend in SpO₂ and your sense of recovery.
Those wishing to spar about duration, destination or adjustment can do so via guidance. Not as a selling point, but as a logical next step when your preparation needs to be precise enough.
Summary reflection
Acclimatising at home makes a complex process manageable. Not by “beating” altitude, but by getting your body used to hypoxic sleep in a controlled way before departure. As a result, you often start more stable, sleep better and reduce the chances of symptoms piling up early in the trip.
The higher your ambition, the more important it becomes that you base decisions on signals rather than planning.
Transition to experiences or guidance
Those who tackle this subject well will find that preparation is not about toughness, but about calmness. And calmness is exactly what you need when altitude starts testing your plan.
Choose the altitude zone that suits your expedition and use the corresponding packages and experiences as a starting point:
- +4000 m packages and Mont Blanc reviews
- +5000 m packages and Kilimanjaro reviews
- +6000 m packages and Aconcagua reviews
- +7000 m packages and Peak Lenin reviews
- +8000 m packages and Mount Everest reviews
❓ Mini-FAQ
What acclimatisation duration do I choose when in doubt?
If you have little margin in your itinerary or were previously prone to altitude complaints, choose “Optimal” rather than “Minimum”. The difference is often in sleep stability and recovery reserve, exactly where decisions are gained or lost at altitude.
What is the clearest signal that I am going too fast?
A combination of poorer sleep and a declining SpO₂ trend that does not recover. In addition, if you notice fatigue becoming cumulative, that is a strong indication to slow down or temporarily sleep lower.